Introduction:
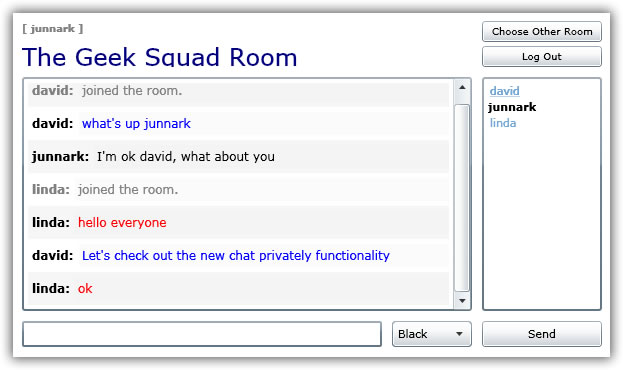
In part 1 we built a simple web chat using Silverlight 2. Now, we are going to add functionalities so that
users are able to choose from multiple chat rooms as well as chat privately with other users. See the revised
snapshot of the Silverlight Web Chat.
 Requirements:
We will add a way for users to choose from a list of chatrooms to enter. A private chat between another user will also be established. The old requirements are still
in effect which is listed below:
- Must be accessible anywhere, and no need to download and install any components. This is why we're going to create a web chat.
- Web chat must be "flicker-free". You'll find out that all processing in Silverlight is done asynchronously.
- We want to be able to monitor chat conversations using a database. We will use MS SQL Server to store conversations and user information.
- Use of dynamic SQL using LINQ-to-SQL instead of stored procedures for a super fast coding.
Database
We will still use our the database with an additional field on the PrivateMessage table as shown below. See
Part 1 for the table descriptions. The additional PrivateMessage
table description is shown below.
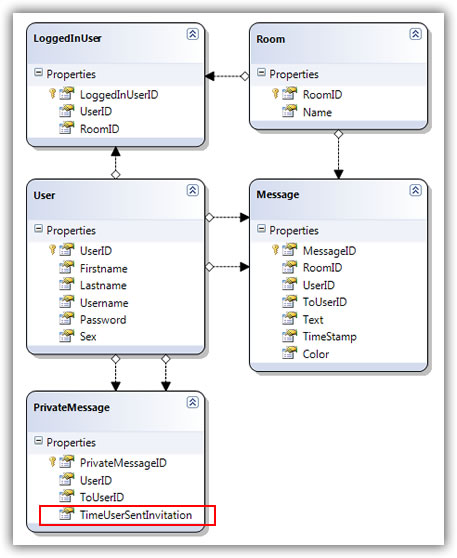
- PrivateMessage: Contains private invitation information. When an invitation to chat privately is sent to another user, an entry is added here.
Newly Added XAML Files
Easily enough, because we started using XAML files based on their functionality in Part 1, we simply need to add two (2) new files; Rooms.xaml and PrivateChat.xaml.
-
Rooms.xaml: Shows a list of chatrooms listed in the Rooms table in our database. So to add new rooms to this web chat application, simply go to
the Rooms table and add as many rooms as you like, no additional coding is needed.
-
PrivateChat.xaml: This is the private chat window that pops-up when a user invited to chat by another user accepts the invitation.
Login Changes
There is a very minor change in our login mechanism (Login.xaml.cs).
1. When the user is authenticated, we save this user to the LoggedInUser table as shown in lines 81-82. Notice that the only information we're passing
is the userID, because this user have not chosen a room just yet. Line 82 (Login.xaml.cs) calls a new method in the ILinqChatService interface:
39 [OperationContract]
40 void LogInUser(int userID);
As usual, this method is implemented in the LinqChatService service.
157 void ILinqChatService.LogInUser(int userID)
158 {
159 // login the user
160 LinqChatDataContext db = new LinqChatDataContext();
161
162 LoggedInUser loggedInUser = new LoggedInUser();
163 loggedInUser.UserID = userID;
164 db.LoggedInUsers.InsertOnSubmit(loggedInUser);
165 db.SubmitChanges();
166 }
2. Rather than going straight to the only room that was availble in Part 1, the user is redirected to the list of rooms page (Rooms.xaml) as shown in line 88.
72 void proxy_UserExistCompleted(object sender, Silverlight2Chat.LinqChatReference.UserExistCompletedEventArgs e)
73 {
74 if (e.Error == null)
75 {
76 int userID = e.Result;
77
78 if (userID != -1)
79 {
80 // save user to the login table
81 LinqChatReference.LinqChatServiceClient proxy = new LinqChatReference.LinqChatServiceClient();
82 proxy.LogInUserAsync(userID);
83
84 // go to the chatroom page
85 App app = (App)Application.Current;
86 app.UserID = userID;
87 app.UserName = TxtUserName.Text;
88 app.RedirectTo(new Rooms());
89 }
90 else
91 {
92 TxtbNotfound.Visibility = Visibility.Visible;
93 }
94 }
95 }
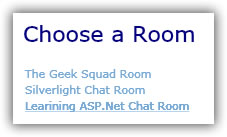
Choose a Room
The interface to Rooms.xaml is very straight forward. It contains two (2) controls; a TextBlock used to hold the title, and a StackPanel that holds a
list of available rooms stacked vertically.
1 <UserControl x:Class="Silverlight2Chat.Rooms"
2 xmlns="http://schemas.microsoft.com/winfx/2006/xaml/presentation"
3 xmlns:x="http://schemas.microsoft.com/winfx/2006/xaml"
4 Width="600" Height="340">
5 <Grid x:Name="LayoutRoot" Background="White" ShowGridLines="False">
6 <Grid.RowDefinitions>
7 <RowDefinition Height="10" /> <!-- padding -->
8 <RowDefinition Height="38" /> <!-- title -->
9 <RowDefinition Height="10" /> <!-- padding -->
10 <RowDefinition Height="*" /> <!-- rooms -->
11 <RowDefinition Height="10" /> <!-- padding -->
12 </Grid.RowDefinitions>
13
14 <Grid.ColumnDefinitions>
15 <ColumnDefinition Width="10" /> <!-- padding -->
16 <ColumnDefinition Width="*" /> <!-- rooms -->
17 <ColumnDefinition Width="10" /> <!-- padding -->
18 </Grid.ColumnDefinitions>
19
20 <TextBlock Text="Choose a Room" Grid.Row="1" Grid.Column="1" FontSize="22" Foreground="Navy" />
21
22 <StackPanel x:Name="SpnlRoomList" Orientation="Vertical" Grid.Row="3" Grid.Column="1" />
23 </Grid>
24 </UserControl>
In the code file (Rooms.xaml.cs), we first check if the user is logged-in in line 26 by checking the UserName. We could just as easily have check the UserID instead of the UserName. Then we
get the chatrooms in line 29. As mentioned in Part 1, because we are trying to get values from the client service proxy (WCF Service), we call the "Completed" event of the
client proxy before calling the "Async" event, lines 35-36. The proxy_GetRoomsCompleted event retrieves all the available rooms from the Room table and assigns them to a
HyperlinkButton, shown in lines 39-55. Notice that line 50 calls the Click event of the HyperlinkButton. When a user
clicks one of the rooms listed in the chatroom list, the HyperlinkButton Click event simply "remembers"
the RoomID and RoomName (lines 62-64), then redirects (line 67) the user to the Chatroom page (Chatroom.xaml). For more information on the basics of a WCF service, please read Part 1.
20 public Rooms()
21 {
22 InitializeComponent();
23
24 App app = (App)Application.Current;
25
26 if (String.IsNullOrEmpty(app.UserName))
27 app.RedirectTo(new Login());
28
29 GetChatRooms();
30 }
31
32 private void GetChatRooms()
33 {
34 LinqChatReference.LinqChatServiceClient proxy = new LinqChatReference.LinqChatServiceClient();
35 proxy.GetRoomsCompleted += new EventHandler<Silverlight2Chat.LinqChatReference.GetRoomsCompletedEventArgs>(proxy_GetRoomsCompleted);
36 proxy.GetRoomsAsync();
37 }
38
39 void proxy_GetRoomsCompleted(object sender, Silverlight2Chat.LinqChatReference.GetRoomsCompletedEventArgs e)
40 {
41 if (e.Error == null)
42 {
43 ObservableCollection<LinqChatReference.RoomContract> rooms = e.Result;
44
45 foreach (var room in rooms)
46 {
47 HyperlinkButton linkButton = new HyperlinkButton();
48 linkButton.Name = room.RoomID.ToString();
49 linkButton.Content = room.Name;
50 linkButton.Click += new RoutedEventHandler(linkButton_Click);
51
52 SpnlRoomList.Children.Add(linkButton);
53 }
54 }
55 }
56
57 void linkButton_Click(object sender, RoutedEventArgs e)
58 {
59 HyperlinkButton linkButton = sender as HyperlinkButton;
60
61 // assign the room
62 App app = (App)Application.Current;
63 app.RoomID = Convert.ToInt32(linkButton.Name);
64 app.RoomName = linkButton.Content.ToString();
65
66 // redirect
67 app.RedirectTo(new Chatroom());
68 }
Chatroom Page
As you probably have already noticed, there is also a very minor revision in the GUI (graphical user interface) of the Chatroom.xaml page. The GUI revision mostly have nothing
to do with functionality. The logged-in UserName was moved on top of the title in a StackPanel, and is now colored gray, line 25. A "Choose Other Room" button is added (line 30) on top
of the Log Out button, also in a StackPanel. Notice that we are using a simple StackPanel (lines 43-44) for the list of users instead of an ItemsControl data template control as
compared to what we used in Part 1, I will explain why later on in this article.
1 <UserControl x:Class="Silverlight2Chat.Chatroom"
2 xmlns="http://schemas.microsoft.com/winfx/2006/xaml/presentation"
3 xmlns:x="http://schemas.microsoft.com/winfx/2006/xaml"
4 Width="600" Height="346">
5 <Grid x:Name="LayoutRoot" Background="White" ShowGridLines="False" Loaded="LayoutRoot_Loaded">
6 <Grid.RowDefinitions>
7 <RowDefinition Height="10" /> <!-- padding -->
8 <RowDefinition Height="46" /> <!-- title -->
9 <RowDefinition Height="10" /> <!-- padding -->
10 <RowDefinition Height="*" /> <!-- messages, userlist -->
11 <RowDefinition Height="10" /> <!-- padding -->
12 <RowDefinition Height="26" /> <!-- message text box, send button -->
13 <RowDefinition Height="10" /> <!-- padding -->
14 </Grid.RowDefinitions>
15
16 <Grid.ColumnDefinitions>
17 <ColumnDefinition Width="10" /> <!-- padding -->
18 <ColumnDefinition Width="*" /> <!-- messages, message text box-->
19 <ColumnDefinition Width="10" /> <!-- padding -->
20 <ColumnDefinition Width="120" /> <!-- user list, send button-->
21 <ColumnDefinition Width="10" /> <!-- padding -->
22 </Grid.ColumnDefinitions>
23
24 <StackPanel Orientation="Vertical" Grid.Row="1" Grid.Column="1">
25 <TextBlock x:Name="TxtbLoggedInUser" FontSize="10" Foreground="Gray" FontWeight="Bold" Margin="0,0,0,4" />
26 <TextBlock x:Name="TxtbRoomName" FontSize="24" Foreground="Navy" />
27 </StackPanel>
28
29 <StackPanel Orientation="Vertical" Grid.Row="1" Grid.Column="3">
30 <Button x:Name="BtnChooseRoom" Content="Choose Other Room" FontSize="10" Click="BtnChooseRoom_Click" Margin="0,0,0,4" />
31 <Button x:Name="BtnLogOut" Content="Log Out" FontSize="10" Click="BtnLogOut_Click" />
32 </StackPanel>
33
34 <ScrollViewer x:Name="SvwrMessages" Grid.Row="3" Grid.Column="1"
35 HorizontalScrollBarVisibility="Hidden"
36 VerticalScrollBarVisibility="Visible" BorderThickness="2">
37 <StackPanel x:Name="SpnlMessages" Orientation="Vertical" />
38 </ScrollViewer>
39
40 <ScrollViewer x:Name="SvwrUserList" Grid.Row="3" Grid.Column="3"
41 HorizontalScrollBarVisibility="Auto"
42 VerticalScrollBarVisibility="Auto" BorderThickness="2">
43 <StackPanel x:Name="SpnlUserList" Orientation="Vertical">
44 </StackPanel>
45 </ScrollViewer>
46
47 <StackPanel Orientation="Horizontal" Grid.Row="5" Grid.Column="1" >
48 <TextBox x:Name="TxtMessage" TextWrapping="Wrap" KeyDown="TxtMessage_KeyDown"
49 ScrollViewer.VerticalScrollBarVisibility="Visible"
50 ScrollViewer.HorizontalScrollBarVisibility="Disabled"
51 Width="360"
52 BorderThickness="2" Margin="0,0,10,0"/>
53
54 <ComboBox x:Name="CbxFontColor" Width="80">
55 <ComboBoxItem Content="Black" Foreground="White" Background="Black" IsSelected="True" />
56 <ComboBoxItem Content="Red" Foreground="White" Background="Red" />
57 <ComboBoxItem Content="Blue" Foreground="White" Background="Blue" />
58 </ComboBox>
59 </StackPanel>
60
61 <Button x:Name="BtnSend" Content="Send" Grid.Row="5" Grid.Column="3" Click="BtnSend_Click" />
62 </Grid>
63 </UserControl>
Most of the changes here were done to support private messages to other users as well as leaving this room to choose another room. With that said, we will dive right into the intricacies of
chatting with other users privately.
1. Getting the Users: As I mentioned above, we changed the ItemsControl to a simple StackPanel that holds the list of users. One of the main reason is that, we want to be able to
show all users as HyperlinkButton(s) besides the current logged-in user, which is you (lines 77-107). Simple enough, the idea is; you don't want to click your own name and accidentally chat with
your own self.
64 void proxy_GetUsersCompleted(object sender, Silverlight2Chat.LinqChatReference.GetUsersCompletedEventArgs e)
65 {
66 if (e.Error == null)
67 {
68 ObservableCollection<LinqChatReference.UserContract> users = e.Result;
69 SpnlUserList.Children.Clear();
70
71 foreach (var user in users)
72 {
73 // show the current user as a non-clickable text only
74 // all other users should be hyperlinks
75 App app = (App)Application.Current;
76
77 if (user.UserID == app.UserID)
78 {
79 TextBlock tb = new TextBlock();
80 tb.Text = user.UserName;
81 tb.Foreground = new SolidColorBrush(Colors.Black);
82 tb.FontWeight = FontWeights.Bold;
83
84 SpnlUserList.Children.Add(tb);
85 }
86 else
87 {
88 HyperlinkButton hb = new HyperlinkButton();
89 hb.Content = user.UserName;
90
91 // build the absolute url
92 Uri url = System.Windows.Browser.HtmlPage.Document.DocumentUri;
93 string link = url.OriginalString;
94 int lastSlash = link.LastIndexOf('/') + 1;
95 link = link.Remove(lastSlash, link.Length - lastSlash) +
96 "Chatroom.aspx?fromuserid=" + app.UserID.ToString() +
97 "&fromusername=" + app.UserName +
98 "&touserid=" + user.UserID +
99 "&tousername=" + user.UserName +
100 "&isinvited=false";
101
102 // build the hyperlink
103 hb.TargetName = "_blank";
104 hb.NavigateUri = new Uri(link);
105
106 SpnlUserList.Children.Add(hb);
107 }
108 }
109 }
110 }
To chat with someone privately, I want to be able to open a new browser when I click a user on the user list. Currently, Silverlight's HyperlinkButton control can only be assigned an absolute URL. So to open up a
new browser, we manipulate the current URL in the browser (lines 92-100 above) to build a link for each of the users. Notice in line 96 above that when this user is clicked,
it will open the "Chatroom.aspx" ASP.Net page. This is because, like we talked about in Part 1, all the XAML user controls are going to be hosted by only one (1) ASP.Net page, and that
page is the Chatroom.aspx page. Because a new browser means new instance of the chat application, the very first XAML user control that we encounter is the App.xaml. So
now, how do we load the PrivateChat.xaml user control? We certainly don't want to enter a username and password each time we click another user to chat privately with them.
That is why we have a few querystring key/value pairs that are assigned to each user link seen in lines 96-100 above, like the "fromusername", "touserid", etc. We will use
the respective values to sign-in the user automatically in the App.xaml user control. The "isinvited" key in line 100 simply states that you are the one inviting the other
user to chat privately, and NOT the one being invited, isinvited=false;. I'll talk more about how we use this value later on.
Let's jump to the
App.xaml user control to see how this process works. You will notice that we added a few public properties to hold and store our
application-wide values. By looking at the highlighted code below, you can guess right away that the querystring key/value pairs shown in the HyperlinkButton (above), in the
users list inside Chatroom.xaml user control are directly related.
17 public int UserID { get; set; }
18 public string UserName { get; set; }
19 public int ToUserID { get; set; }
20 public string ToUserName { get; set; }
21 public DateTime TimeUserJoined { get; set; }
22 public int RoomID { get; set; }
23 public string RoomName { get; set; }
24 public bool IsInvited { get; set; }
25 public DateTime TimeUserSentInviation { get; set; }
Lines 64-69 below retrieves the key/value pairs from the querystring and then assigns them to the public properties of the App.xaml user control. To load the PrivateChat user control instead
of the Login user control, we simply check at least one value from the url, indicating that this user has opened a private chat window. In this case, we're just checking the "fromusername" key
shown in line 61. Lines 43-53 determines what XAML user control to load.
38 private void Application_Startup(object sender, StartupEventArgs e)
39 {
40 this.RootVisual = rootGrid;
41
42 // check if it's a private chat request
43 if (IsPrivateChatRequest())
44 {
45 // open private chat instead of login page
46 rootGrid.Children.Add(new PrivateChat());
47 }
48 else
49 {
50 // start at the login page
51 // this.RootVisual = rootGrid;
52 rootGrid.Children.Add(new Login());
53 }
54 }
55
56 private bool IsPrivateChatRequest()
57 {
58 Uri uri = System.Windows.Browser.HtmlPage.Document.DocumentUri;
59 IDictionary<string, string> queryString = System.Windows.Browser.HtmlPage.Document.QueryString;
60
61 if (uri.ToString().Contains("fromusername"))
62 {
63 // set all the app wide variables
64 App app = (App)Application.Current;
65 app.UserID = Convert.ToInt32(queryString["fromuserid"]);
66 app.UserName = queryString["fromusername"];
67 app.ToUserID = Convert.ToInt32(queryString["touserid"]);
68 app.ToUserName = queryString["tousername"];
69 app.IsInvited = Convert.ToBoolean(queryString["isinvited"]);
70
71 try
72 {
73 app.TimeUserSentInviation = Convert.ToDateTime(queryString["timeusersentinvitation"]);
74 }
75 catch { }
76
77 return true;
78 }
79 else
80 {
81 return false;
82 }
83 }
2. Responding to a Private Chat Invitation. Now back to the
Chatroom.xaml user control. We just talked about the process of opening a private chat window so
that you can invite another user to chat with you privately. At this point, you have not sent an invitation yet, you just opened the private chat window. You
send an invitation to chat as soon as you send your first message to the other user. Let me talk about this process later when we get to the PrivateChat
user control part of the article. For now, I will talk about how the other user (the one you're inviting to chat privately) can respond to your invitation.
We check the private message invitations from other users to you on the TimerControl's Tick event. In this event we call the GetPrivateMessages method to check for any invitation. This of
course calls our WCF service via a client proxy as discussed above.
261 void TimerTick(object sender, EventArgs e)
262 {
263 GetMessages();
264 GetUsers();
265 GetPrivateMessages();
266 }
267
268 private void GetPrivateMessages()
269 {
270 // get the private message invitations sent to me by other chatters
271 LinqChatReference.LinqChatServiceClient proxy = new LinqChatReference.LinqChatServiceClient();
272 proxy.GetPrivateMessageInvitesCompleted += new EventHandler<Silverlight2Chat.LinqChatReference.GetPrivateMessageInvitesCompletedEventArgs>(proxy_GetPrivateMessageInvitesCompleted);
273 proxy.GetPrivateMessageInvitesAsync(_userID);
274 }
The implementation of getting the private message invitations is shown below, and can be found along with the other implementations of the ILinqChatService interface, in the LinqChatService.svc service.
275 List<PrivateMessageContract> ILinqChatService.GetPrivateMessageInvites(int toUserID)
276 {
277 List<PrivateMessageContract> pmContracts = new List<PrivateMessageContract>();
278 LinqChatDataContext db = new LinqChatDataContext();
279
280 var pvtMessages = from pm in db.PrivateMessages
281 where pm.ToUserID == toUserID
282 select new { pm.PrivateMessageID, pm.UserID, pm.User.Username, pm.ToUserID, pm.TimeUserSentInvitation };
283
284 if (pvtMessages.Count() > 0)
285 {
286 foreach(var privateMessage in pvtMessages)
287 {
288 PrivateMessageContract pmc = new PrivateMessageContract();
289 pmc.PrivateMessageID = privateMessage.PrivateMessageID;
290 pmc.UserID = privateMessage.UserID;
291 pmc.UserName = privateMessage.Username;
292 pmc.ToUserID = privateMessage.ToUserID;
293 pmc.TimeUserSentInvitation = privateMessage.TimeUserSentInvitation;
294
295 pmContracts.Add(pmc);
296 }
297 }
298
299 return pmContracts;
300 }
Each invitation will cause to show a Silverlight Popup control as shown in the image below.
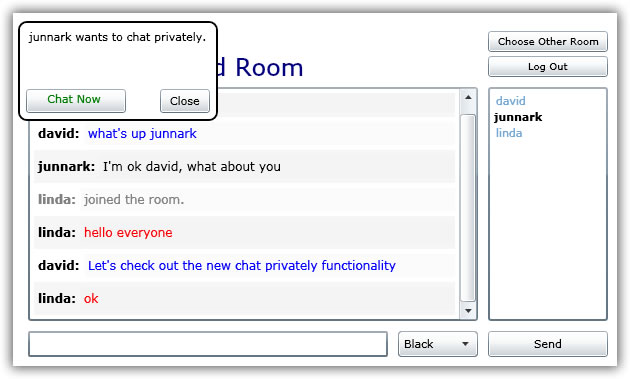
The code that builds this Popup control for each invitation and causes the pop-up to show can be found in the GetPrivateMessage
Completed event shown below. I know what you're thinking, "it takes this much code to show a very simple pop-up control?",
the answer is Yes. What's even more amazing is each of the buttons, the Close and Chat Now buttons have their own Click
event code, so that makes the code even longer, line 346 and 357. The code shown below simply adds a TextBlock control, a
dummy Chat Now Button control, a Close Button control and a Chat Now HyperlinkButton control to the Grid control which is a
Child of the Popup control. The Popup control is set to show or set to be visible as shown in line 285.
The dummy Chat Now Button control is used as a "background" control to the real Chat Now HyperlinkButton control so that we can make the HyperlinkButton control look like a button. This is
just my preference, you could have as easily assigned the HyperlinkButton control's Content property to show a button, or even design the HyperlinkButton to show like a button. You can
see that both the Button and HyperlinkButton are located in the same spot, lines 316 and 328.
276 void proxy_GetPrivateMessageInvitesCompleted(object sender, Silverlight2Chat.LinqChatReference.GetPrivateMessageInvitesCompletedEventArgs e)
277 {
278 ObservableCollection<LinqChatReference.PrivateMessageContract> invitations = e.Result;
279
280 foreach (var invitation in invitations)
281 {
282 Popup popUp = new Popup();
283 Grid grid = new Grid();
284 popUp.Child = grid;
285 popUp.IsOpen = true;
286 popUp.Name = "PopUpInvitation" + invitation.PrivateMessageID.ToString();
287
288 // add popup to the root grid
289 LayoutRoot.Children.Add(popUp);
290
291 grid.Width = 200;
292 grid.Height = 100;
293 grid.HorizontalAlignment = HorizontalAlignment.Center;
294
295 // pop-up border
296 Border border = new Border();
297 border.BorderBrush = new SolidColorBrush(Colors.Black);
298 border.BorderThickness = new Thickness(2);
299 border.CornerRadius = new CornerRadius(8);
300 border.Background = new SolidColorBrush(Colors.White);
301
302 // pop-up text
303 App app = (App)Application.Current;
304
305 TextBlock textBlock = new TextBlock();
306 textBlock.Text = app.UserName + " wants to chat privately.";
307 textBlock.HorizontalAlignment = HorizontalAlignment.Center;
308 textBlock.VerticalAlignment = VerticalAlignment.Top;
309 textBlock.Margin = new Thickness(8);
310
311 // accept button - background only
312 Button btnAccept = new Button();
313 btnAccept.Width = 100;
314 btnAccept.Height = 24;
315 btnAccept.HorizontalAlignment = HorizontalAlignment.Left;
316 btnAccept.VerticalAlignment = VerticalAlignment.Bottom;
317 btnAccept.Margin = new Thickness(8);
318
319 // accept hyperlink - put on top of the accept button
320 HyperlinkButton hpBtn = new HyperlinkButton();
321 hpBtn.Name = "HbtnChatNow" + invitation.PrivateMessageID.ToString();
322 hpBtn.Width = 100;
323 hpBtn.Height = 22;
324 hpBtn.Content = " Chat Now ";
325 hpBtn.Foreground = new SolidColorBrush(Colors.Green);
326 hpBtn.Background = new SolidColorBrush(Colors.Transparent);
327 hpBtn.HorizontalAlignment = HorizontalAlignment.Left;
328 hpBtn.VerticalAlignment = VerticalAlignment.Bottom;
329 hpBtn.Margin = new Thickness(8);
330
331 // build the absolute url
332 Uri url = System.Windows.Browser.HtmlPage.Document.DocumentUri;
333 string link = url.OriginalString;
334 int lastSlash = link.LastIndexOf('/') + 1;
335 link = link.Remove(lastSlash, link.Length - lastSlash) +
336 "Chatroom.aspx?fromuserid=" + app.UserID.ToString() +
337 "&fromusername=" + app.UserName +
338 "&touserid=" + invitation.UserID +
339 "&tousername=" + invitation.UserName +
340 "&isinvited=true" +
341 "&timeusersentinvitation=" + invitation.TimeUserSentInvitation.ToString();
342
343 // build the hyperlink
344 hpBtn.TargetName = "_blank";
345 hpBtn.NavigateUri = new Uri(link);
346 hpBtn.Click += new RoutedEventHandler(hpBtn_Click);
347
348 // close button
349 Button btnClose = new Button();
350 btnClose.Name = "BtnClose" + invitation.PrivateMessageID.ToString();
351 btnClose.Width = 50;
352 btnClose.Height = 24;
353 btnClose.Content = "Close";
354 btnClose.HorizontalAlignment = HorizontalAlignment.Right;
355 btnClose.VerticalAlignment = VerticalAlignment.Bottom;
356 btnClose.Margin = new Thickness(8);
357 btnClose.Click += new RoutedEventHandler(btnClose_Click);
358
359 // add to grid
360 grid.Children.Add(border);
361 grid.Children.Add(textBlock);
362 grid.Children.Add(btnAccept);
363 grid.Children.Add(hpBtn);
364 grid.Children.Add(btnClose);
365
366 // delete private message invation from database
367 LinqChatReference.LinqChatServiceClient proxy = new LinqChatReference.LinqChatServiceClient();
368 proxy.DeletePrivateMessageAsync(invitation.PrivateMessageID);
369 }
370 }
The close Button and the chat now HyperlinkButton pretty much does the same thing when you click on them as shown in their respective Click events below. They simply get the name of the Popup control
to close and then closes them by doing popUp.IsOpen = false. But the chat now HyperlinkButton also opens up the PrivateChat.xaml user control in the browser, much like the same way we opened up
a new browser when we invited someone to chat privately with us earlier in this article. This is because we used pretty much the same code as shown in lines 332-341 shown above, the only
differences are; the value on the "isinvited" which is "true" in line 340 (signifies that you're the one being invited to chat privately),
and another key/value pair is added in line 341, "timeusersentinvitation", which signifies the time the other user sent you the invitation to chat privately. We will use the value from the
"timeusersentinvitation" to get all the private messages from the time the the other user sent you an invitation. I will talk more about this later.
372 void hpBtn_Click(object sender, RoutedEventArgs e)
373 {
374 // get the name of the pop-up to close
375 // based from the name of the hyperlink button
376 HyperlinkButton button = sender as HyperlinkButton;
377 string privateMessageID = button.Name.Replace("HbtnChatNow", "");
378
379 Popup popUp = (Popup)LayoutRoot.FindName("PopUpInvitation" + privateMessageID);
380 popUp.IsOpen = false;
381 }
382
383 void btnClose_Click(object sender, RoutedEventArgs e)
384 {
385 // get the name of the pop-up to close
386 // based from the name of the button
387 Button button = sender as Button;
388 string privateMessageID = button.Name.Replace("BtnClose", "");
389
390 Popup popUp = (Popup) LayoutRoot.FindName("PopUpInvitation" + privateMessageID);
391 popUp.IsOpen = false;
392 }
PrivateChat User Control
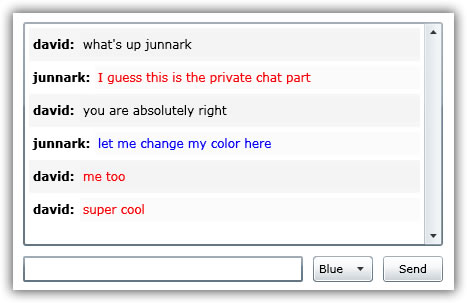
As you can see, this control looks just like the Chatroom user control, except that some controls are ommited such as the title, log-out button, etc. And because of the similarities, the way
we send messages or receive messages works the same way, except we're only sending them to one user. Shown below is the PrivateChat user control GUI code.
1 <UserControl x:Class="Silverlight2Chat.PrivateChat"
2 xmlns="http://schemas.microsoft.com/winfx/2006/xaml/presentation"
3 xmlns:x="http://schemas.microsoft.com/winfx/2006/xaml"
4 Width="440" Height="280">
5 <Grid x:Name="LayoutRoot" Background="White" ShowGridLines="False" Loaded="LayoutRoot_Loaded">
6 <Grid.RowDefinitions>
7 <RowDefinition Height="10" /> <!-- padding -->
8 <RowDefinition Height="*" /> <!-- messages -->
9 <RowDefinition Height="10" /> <!-- padding -->
10 <RowDefinition Height="26" /> <!-- message text box, send button -->
11 <RowDefinition Height="10" /> <!-- padding -->
12 </Grid.RowDefinitions>
13
14 <Grid.ColumnDefinitions>
15 <ColumnDefinition Width="10" /> <!-- padding -->
16 <ColumnDefinition Width="*" /> <!-- messages, message text box-->
17 <ColumnDefinition Width="10" /> <!-- padding -->
18 </Grid.ColumnDefinitions>
19
20 <ScrollViewer x:Name="SvwrMessages" Grid.Row="1" Grid.Column="1"
21 HorizontalScrollBarVisibility="Hidden"
22 VerticalScrollBarVisibility="Visible" BorderThickness="2">
23 <StackPanel x:Name="SpnlMessages" Orientation="Vertical" />
24 </ScrollViewer>
25
26 <StackPanel Orientation="Horizontal" Grid.Row="3" Grid.Column="1" >
27 <TextBox x:Name="TxtMessage" TextWrapping="Wrap" KeyDown="TxtMessage_KeyDown"
28 ScrollViewer.VerticalScrollBarVisibility="Visible"
29 ScrollViewer.HorizontalScrollBarVisibility="Disabled"
30 Width="280"
31 BorderThickness="2" Margin="0,0,10,0"/>
32
33 <ComboBox x:Name="CbxFontColor" Width="60" Margin="0,0,10,0">
34 <ComboBoxItem Content="Black" Foreground="White" Background="Black" IsSelected="True" />
35 <ComboBoxItem Content="Red" Foreground="White" Background="Red" />
36 <ComboBoxItem Content="Blue" Foreground="White" Background="Blue" />
37 </ComboBox>
38
39 <Button x:Name="BtnSend" Content="Send" Click="BtnSend_Click" Width="60" />
40 </StackPanel>
41
42 </Grid>
43 </UserControl>
1. Invite Another User to Chat Privately. When you clicked one of the users listed in the Chatroom.xaml page, this private chat window appears. To invite someone to chat privately
you first need to send at least one message to the other user. Lines 201-205.
185 private void BtnSend_Click(object sender, RoutedEventArgs e)
186 {
187 SendMessage();
188 }
189
190 private void SendMessage()
191 {
192 if (!String.IsNullOrEmpty(TxtMessage.Text))
193 {
194 InsertMessage();
195 GetPrivateMessages();
196
197 // send an invitation to chat only if you're the one that
198 // is sending the invitation, this means that you clicked
199 // one of the users in the user list in the main chat
200 // and did not click the invitation to chat pop up
201 if (_isInvitationToChatSent == false && _isInvited == false)
202 {
203 InviteOtherUserToChat();
204 _isInvited = true;
205 }
206 }
207 }
The method called in line 203 above is shown below. Because we are not expecting anything to be returned from the WCF service shown below, we need not call the Completed event of
the InsertPrivateMessageInvite object. In short, we only need to call the "Async" method of this client proxy.
214 private void InviteOtherUserToChat()
215 {
216 LinqChatReference.LinqChatServiceClient proxy = new LinqChatReference.LinqChatServiceClient();
217 proxy.InsertPrivateMessageInviteAsync(_fromUserID, _toUserID);
218 }
The Async WCF call in line 217 above calls the WCF service method found in LinqChatService.cs. Notice that the async call above and the method below have the same signature. The service below
inserts an entry in the PrivateMessage table.
243 void ILinqChatService.InsertPrivateMessageInvite(int userID, int toUserID)
244 {
245 // first check if an invitation to chat has already
246 // been sent to the particular user "toUserID"
247 LinqChatDataContext db = new LinqChatDataContext();
248
249 var count = (from pvtm in db.PrivateMessages
250 where pvtm.UserID == userID &&
251 pvtm.ToUserID == toUserID
252 select new { pvtm.PrivateMessageID }).Count();
253
254 if (count == 0)
255 {
256 // no invitation was found
257 PrivateMessage pm = new PrivateMessage();
258 pm.UserID = userID;
259 pm.ToUserID = toUserID;
260 pm.TimeUserSentInvitation = DateTime.Now;
261
262 db.PrivateMessages.InsertOnSubmit(pm);
263
264 try
265 {
266 db.SubmitChanges();
267 }
268 catch (Exception)
269 {
270 throw;
271 }
272 }
273 }
2. Sending Private Messages. In the chatroom, we're getting all the messages displayed from all the users that are chatting. Here, we're only supposed to get messages between the
two users privately chatting with each other. This is simple enough to solve. In the Chatroom.xaml user control when we insert a message in the Message table, the "_toUserID" is set to null,
here we simply set that value to the user that we're trying to chat with. The _toUserID value is set in this user control's constructor, which is retrieved from the App.xaml's public properties.
19 DispatcherTimer timer;
20 private bool _isTimerStarted;
21 private bool _isWithBackground = false;
22 private int _lastMessageId = 0;
23 private int _fromUserID;
24 private int _toUserID;
25 private bool _isInvited;
26 private bool _isInvitationToChatSent = false;
27 private DateTime _timeUserSentInvitation;
28
29 public PrivateChat()
30 {
31 InitializeComponent();
32
33 App app = (App)Application.Current;
34
35 if (String.IsNullOrEmpty(app.UserName))
36 {
37 app.RedirectTo(new Login());
38 }
39 else
40 {
41 _fromUserID = app.UserID;
42 _toUserID = app.ToUserID;
43 _isInvited = app.IsInvited;
44
45 if (_isInvited)
46 _timeUserSentInvitation = app.TimeUserSentInviation;
47 else
48 _timeUserSentInvitation = DateTime.Now;
49 }
50 }
This makes it very simple to send the message to the other user.
68 private void InsertMessage()
69 {
70 LinqChatReference.LinqChatServiceClient proxy = new LinqChatReference.LinqChatServiceClient();
71 proxy.InsertMessageAsync(null, _fromUserID, _toUserID, TxtMessage.Text, CbxFontColor.SelectionBoxItem.ToString());
72 }
3. Getting Private Messages. Just like when we're sending messages to another user privately, we need to populate the _fromUserID and _toUserID variables to retrieve just the messages
meant for this exclusive chat users. Another piece of information we need to populate from the very first time the "inviting" user sent an invitation to chat privately is assigned to
the _timeUserSentInvitation variable. This way we will only retrieve the messages from that time on and above.
74 private void GetPrivateMessages()
75 {
76 LinqChatReference.LinqChatServiceClient proxy = new LinqChatReference.LinqChatServiceClient();
77 proxy.GetPrivateMessagesCompleted += new EventHandler<Silverlight2Chat.LinqChatReference.GetPrivateMessagesCompletedEventArgs>(proxy_GetPrivateMessagesCompleted);
78 proxy.GetPrivateMessagesAsync(_timeUserSentInvitation, _lastMessageId, _fromUserID, _toUserID);
79 }
The GetPrivateMessagesCompleted event here does the same thing as the GetMessagesCompleted event in the Chatroom.xaml user control so I'm not going to spend any
time explaining it. For more information on the Completed event see Part 1. The Async proxy code above calls the WCF service GetPrivateMessages located in
LinqChatService.svc.cs. One thing I would like to stress out is the way we built the query especially the code shown in lines 68-69. We are retrieving all messages sent
by either user chatting privately which is "sent to" either user chatting privately.
62 List<MessageContract> ILinqChatService.GetPrivateMessages(DateTime timeUserSentInvitation, int messageID, int fromUserId, int toUserId)
63 {
64 LinqChatDataContext db = new LinqChatDataContext();
65
66 var messages = (from m in db.Messages
67 where
68 ((m.UserID == fromUserId && m.ToUserID == toUserId) ||
69 (m.ToUserID == fromUserId && m.UserID == toUserId)) &&
70 m.TimeStamp >= timeUserSentInvitation &&
71 m.MessageID > messageID
72 orderby m.TimeStamp ascending
73 select new { m.MessageID, m.Text, m.User.Username, m.TimeStamp, m.Color });
74
75 List<MessageContract> messageContracts = new List<MessageContract>();
76
77 foreach (var message in messages)
78 {
79 MessageContract messageContract = new MessageContract();
80 messageContract.MessageID = message.MessageID;
81 messageContract.Text = message.Text;
82 messageContract.UserName = message.Username;
83 messageContract.Color = message.Color;
84 messageContracts.Add(messageContract);
85 }
86
87 return messageContracts;
88 }
4. Resizing the Private Chat Window
Silverlight 2 unfornately does not have a functionality to open a new window in a specified size at the time of this writing. Remember that we're hosting all the XAML user controls using just one ASP.net page. So
to dynamically resize this ASP.net page only when the PrivateChat.xaml user control is loaded, we need some kind of indication, somehow passing the information from a XAML user control to an ASP.Net page. Luckilly
enough, we can write some hack in JavaScript to to just this. Using JavaScript, we can examine at least one querystring key/value pair from the Chatroom.aspx page. In this case, we are going to check
for the "fromusername" key. If the key is there, we resize the window (Chatroom.aspx) to 640 x 460.
9 <script type="Text/javascript">
10 window.onload = function()
11 {
12 ResizeWindow();
13 document.getElementById('Xaml1').focus();
14 }
15
16 function ResizeWindow()
17 {
18 var fromusername = GetQueryString("fromusername");
19
20 if (fromusername != null)
21 {
22 // resize the screen
23 window.resizeTo(640, 460);
24 }
25 }
26
27 function GetQueryString(variable)
28 {
29 var query = window.location.search.substring(1);
30 var vars = query.split("&");
31
32 for (var i = 0; i < vars.length; i++)
33 {
34 var pair = vars[i].split("=");
35
36 if (pair[0] == variable)
37 return pair[1];
38 }
39 }
40 </script>
Choosing Other Rooms
You need to leave your current room to enter another room. You can click the button with the text "Choose Other Room" located in the Chatroom.xaml user control. The click event is shown below.
406 private void BtnChooseRoom_Click(object sender, RoutedEventArgs e)
407 {
408 timer.Stop();
409 App app = (App)Application.Current;
410
411 // leave the room to choose another room
412 LinqChatReference.LinqChatServiceClient proxy = new LinqChatReference.LinqChatServiceClient();
413 proxy.LeaveRoomAsync(_userID, _roomId, app.UserName);
414
415 // redirect to the rooms page
416 app.RedirectTo(new Rooms());
417 }
The proxy client method above calls the WCF service method shown below. The only difference with this method and the Log Out method is that; Here we are only setting the RoomID = null in the
LoggedInUser table, whereas in the Log Out method, we are totally deleting this user from the LoggedInUser table.
194 void ILinqChatService.LeaveRoom(int userID, int roomID, string username)
195 {
196 // leave the room by setting room id = null
197 LinqChatDataContext db = new LinqChatDataContext();
198
199 var loggedInUser = (from l in db.LoggedInUsers
200 where l.UserID == userID
201 && l.RoomID == roomID
202 select l).SingleOrDefault();
203
204 loggedInUser.RoomID = null;
205 db.SubmitChanges();
206
207 // insert user "left the room" text
208 Message message = new Message();
209 message.RoomID = roomID;
210 message.UserID = userID;
211 message.ToUserID = null;
212 message.Text = username + " left the room.";
213 message.Color = "Gray";
214 message.TimeStamp = DateTime.Now;
215
216 db.Messages.InsertOnSubmit(message);
217 db.SubmitChanges();
218 }
Because this is a Web Chat application, you could of course open several browsers, log-in in each browser, and then enter different rooms at the same time.
Last Words:
I hope that you learned something out of this article. I did not discuss the basics of WCF (Windows Communication Foundation), nor did I discuss the formatting
of the messages in the chatroom because these and others can be found in Part 1. The article is meant for learning the processes
of establishing a monitored private chat using Silverlight 2 and MS SQL Server. There are a lot of things that you can improve here. For example, to improve performance, you can change
all calls to the database using Stored Procedures instead of Dynamic SQL. Rather than being too chatty, you can also combine calls to the database to make one trip instead of several trips
like the methods found in the TimerTick event of the Chatroom.xaml user control.
As always, the code and the article are provided "As Is", there is absolutely no warranties. Use at your own risk.